Account Setup, Verification and Deposits in USDT
Step by step: create your Traders Portal account, verify your identity, answer the short questionnaire and fund your account in USDT by crypto, wire or card.
Before you can place a real trade on Traders Portal, you need an account, a verified identity and some money in it. The process happens in your browser or on your phone and follows a fixed order: sign up, add your details, upload your documents, wait for the review, answer a short questionnaire, then deposit.
Your account is kept in USDT, a stablecoin designed to track the US dollar. Balances are shown with a $ sign because 1 USDT is treated as $1. This guide walks through each screen and points out the details that most often slow people down. If USDT is new to you, read What Is USDT first.
What you need before you start
Gather these first and you can finish in one sitting:
- An email address you can open right away, for the sign-up code.
- Your mobile number.
- A valid passport, national ID card or driver's license.
- A proof of address dated within the last 90 days, showing your name and the address you will enter.
- A phone or webcam for a selfie holding your ID.
Files can be JPG, PNG or PDF, up to 10 MB each.
Step 1: Create your account
- Sign up with your email
Go to the sign-up page and enter your email address. Traders Portal emails you a code; type it in to confirm the address is yours.
- Set a strong password
Choose a password you do not use anywhere else. Passwords need at least 8 characters, including an upper-case letter, a lower-case letter and a digit; a longer passphrase is stronger still.
- Plan to switch on 2FA
Two-factor authentication (2FA) adds a second check, a code from an authenticator app, when you log in. Switch it on under Account → Personal information → Security. Security Basics explains why it matters.
Step 2: Add your personal details
Onboarding first asks for your legal name, date of birth, nationality, country of residence, address and mobile number. Enter your name exactly as it appears on your ID, including middle names, and your address exactly as it appears on your proof of address. Small mismatches are one of the most common reasons documents are sent back.
Step 3: Verify your identity
Next you upload three things. This identity check is often called KYC, short for "know your customer".
| Document | What to upload | Common reasons for rejection |
|---|---|---|
| Photo ID | Front and back of a passport, ID card or driver's license | Cropped corners, glare, expired document |
| Selfie | You holding the same ID next to your face | Face or ID unreadable, a different ID used |
| Proof of address | A document dated within 90 days | Too old, name or address does not match |
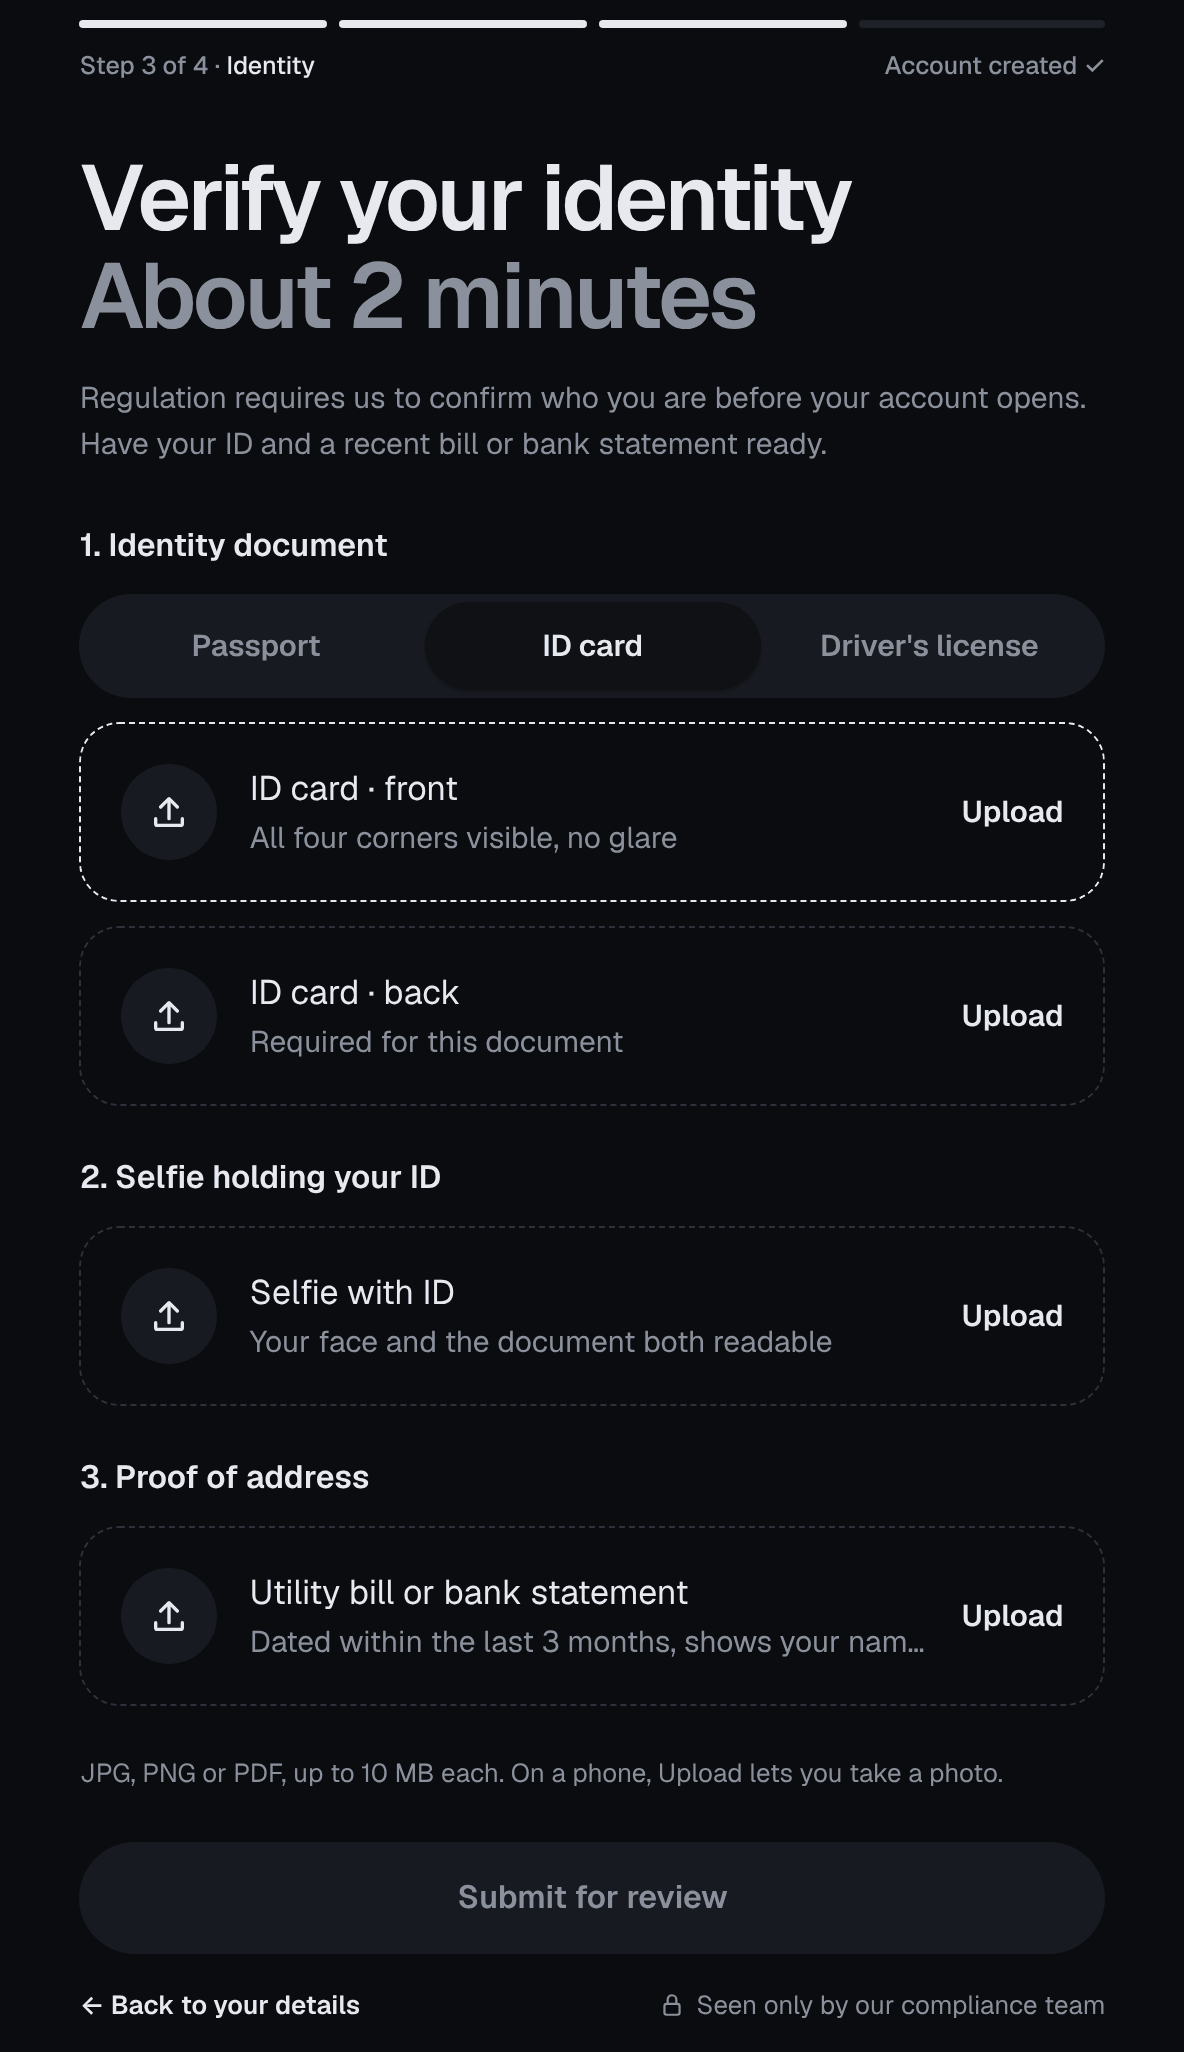
Once everything is uploaded, your account shows as under review. Allow the review time shown when you send your documents. If a document is rejected, you can usually replace just that document.
Above a certain deposit level you may also be asked about the source of your funds. That request appears under Personal Information on the Source of funds tab.
Step 4: Answer the trading-experience questionnaire
Before your first deposit, Traders Portal asks a short set of questions about your trading knowledge and experience. Answer honestly. The questions help check whether leveraged products are appropriate for you, and there is nothing to gain from overstating your experience. CFDs are high-risk, and most traders lose money trading them.
Step 5: Deposit funds
Open the Deposit page with the Deposit button in the top bar, from the account menu, or at Account → Deposit. It has three tabs: Crypto, Wire transfer and Card. Each deposit must be at least the minimum shown on the Deposit page.
Depositing USDT by crypto
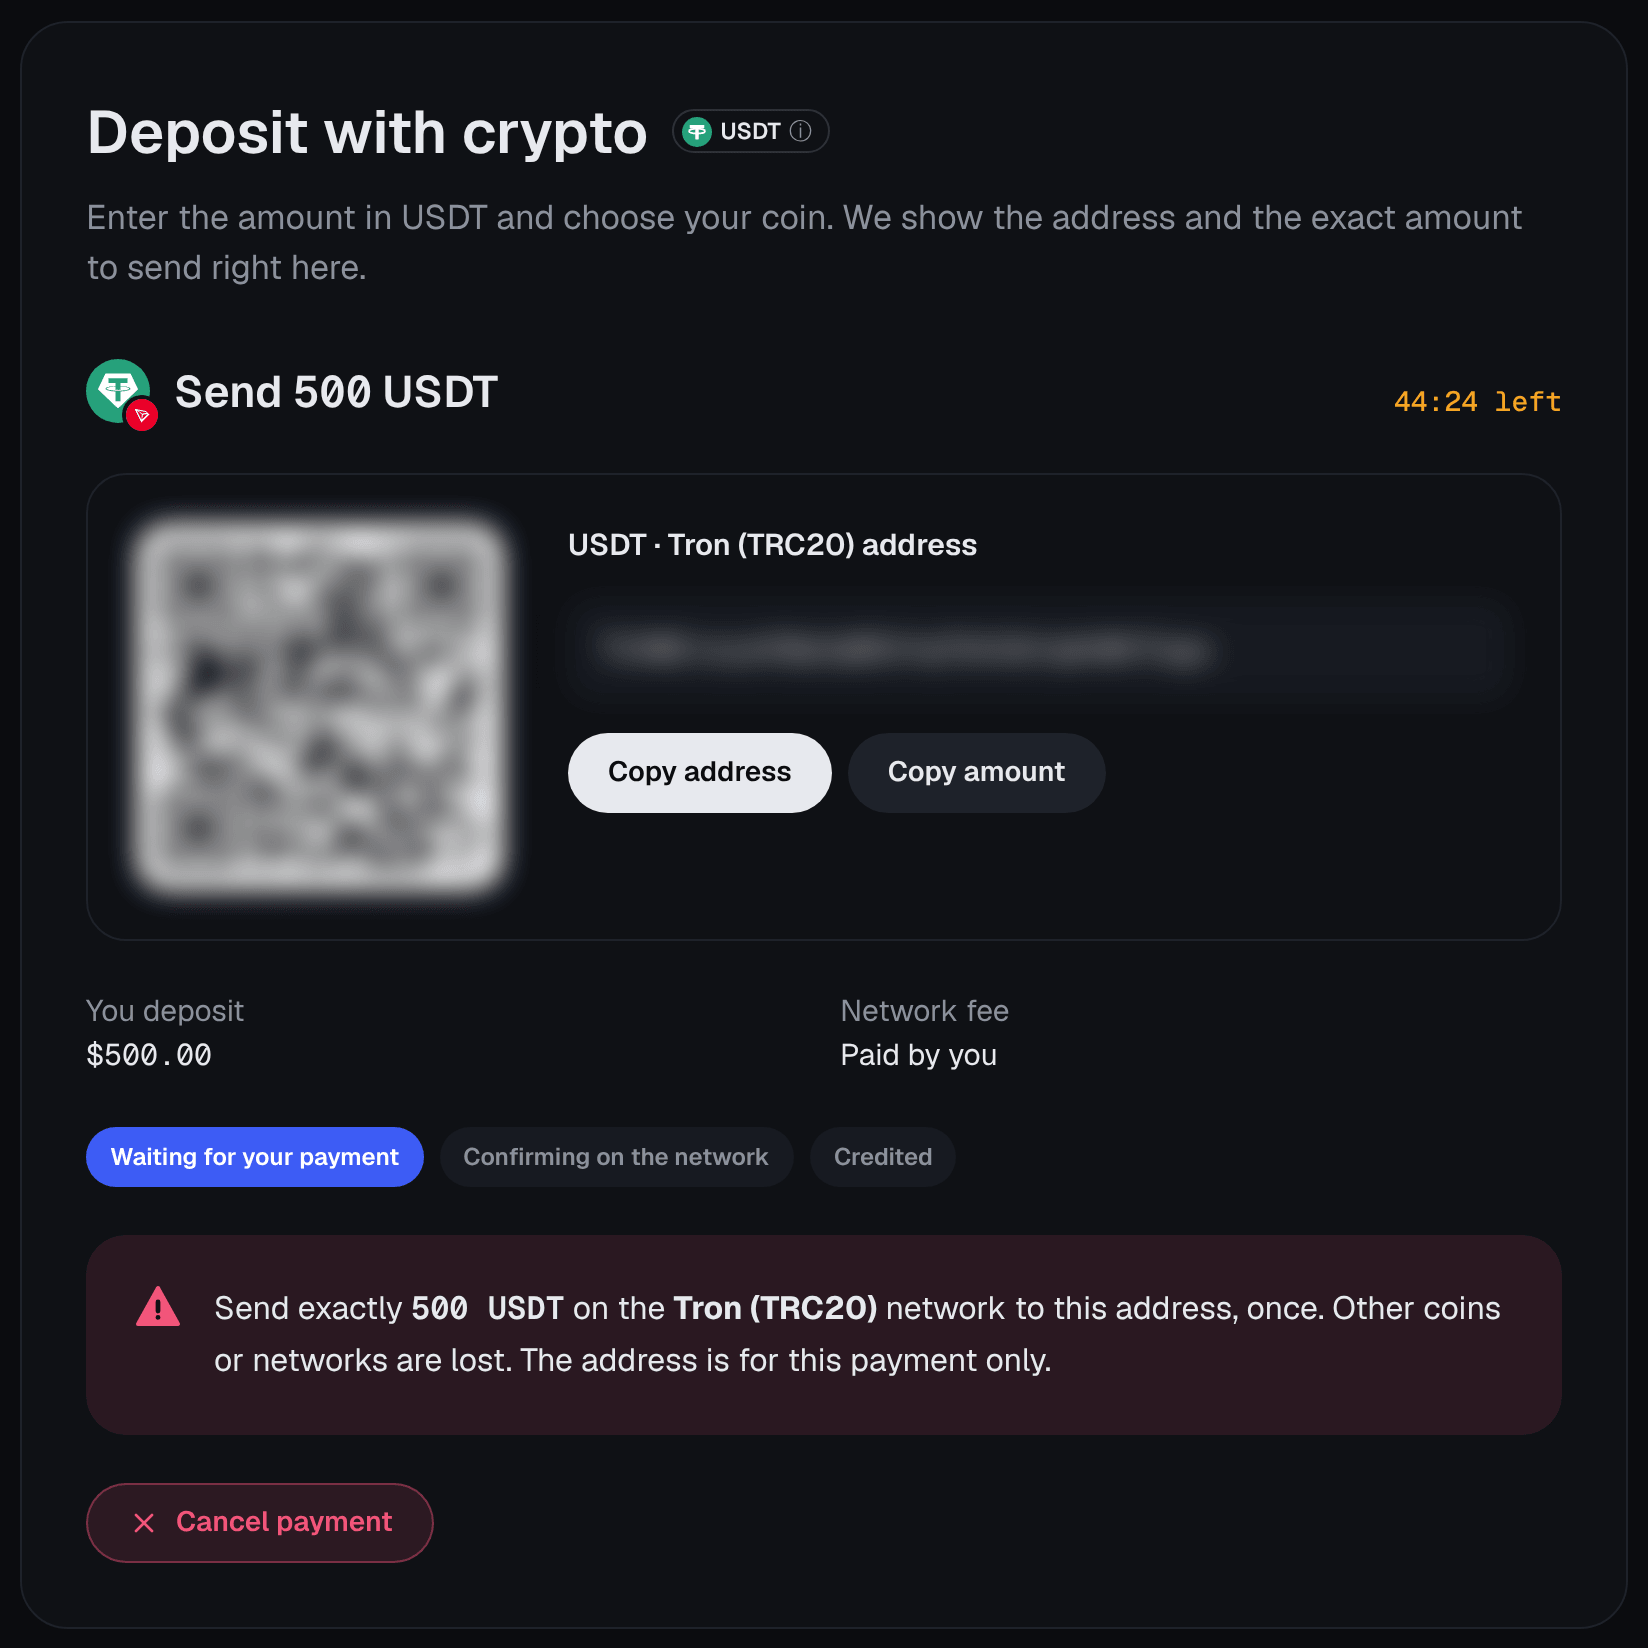
The Crypto tab offers two routes: a payment page that shows an address, a QR code and a timer, or a USDT deposit address on one of three networks, TRC20, ERC20 or BEP20.
- Choose the network
Pick the network your sending wallet or exchange will use. The deposit address belongs to that network only.
- Copy the address or scan the QR code
Use the copy button or the QR code rather than typing the address. Check the first and last few characters in your wallet before you send.
- Send from your wallet or exchange
Select the same network on the sending side. On the payment page, send before the timer runs out.
- Wait for the deposit to arrive
The blockchain must confirm the transfer before your balance is credited. The amount then appears in USDT in your Wallet and in the client bar.
| Network | Blockchain | Address starts with | Watch out for |
|---|---|---|---|
| TRC20 | Tron | T | Your exchange may call it "Tron (TRC20)" |
| ERC20 | Ethereum | 0x | Looks identical to a BEP20 address |
| BEP20 | BNB Smart Chain | 0x | Looks identical to an ERC20 address |
Wire transfer and card
The Wire transfer and Card tabs create a deposit request in USD, GBP or EUR. Follow the instructions on the tab and keep any reference it gives you, because a bank transfer without the right reference can take longer to match to your account. Your trading balance is held in USDT.
If something goes wrong
- The sign-up code has not arrived. Check your spam folder and that the email address was typed correctly.
- Verification is taking longer than expected. Look at the KYC tab under Personal Information in case a document needs replacing.
- A crypto deposit has not appeared. Find the transaction ID (hash) in your sending wallet and check it on a block explorer. If it is confirmed but still missing, contact support from Account → Support with the network, amount and transaction ID.
Support staff will never ask for your password or 2FA codes, so never share them, whoever asks.
After your first deposit
Your balance shows on the Wallet page and in the client bar on the trade screen. Before trading with it, consider practicing first: the Demo button in the desktop top bar gives you a virtual balance to practice with on the same screens, without real money.
When you are ready, the Platform Tour explains every part of the trade screen.
Conclusion
Setting up a Traders Portal account comes down to five steps: sign up with your email, add your details, upload your ID, selfie and proof of address, answer the questionnaire, and deposit. Most delays come from mismatched names, blurry photos or old address documents, and most lost deposits come from choosing the wrong network. Take a minute over each of those, switch on 2FA, and only deposit money you can afford to lose.
Related reading
FAQs
- How long does identity verification take?
- Once you send your documents, your account shows as under review. Allow the review time shown when you send your documents; unclear or mismatched documents are the most common reason it takes longer.
- Which documents can I use to verify my identity?
- A passport, national ID card or driver's license (front and back), a selfie of you holding that same document, and a proof of address dated within the last 90 days. Files can be JPG, PNG or PDF, up to 10 MB each.
- Which USDT network should I choose for a crypto deposit?
- Choose one of the networks offered on the Deposit page (TRC20, ERC20 or BEP20) that your sending wallet or exchange also supports. The network you send on must match the network of the deposit address exactly.
- What happens if I send USDT on the wrong network?
- Funds sent on a network that does not match the deposit address may never arrive and can be lost. Contact support from Account → Support straight away with the transaction details, but recovery is not always possible.
- Can I deposit in US dollars, euros or pounds?
- Yes. The Wire transfer and Card tabs on the Deposit page let you request a deposit in USD, GBP or EUR. Your trading account itself is kept in USDT.
- Why am I being asked about the source of my funds?
- Above a certain deposit level, Traders Portal may ask where your money comes from as part of its account checks. If it does, the request appears under Personal Information on the Source of funds tab.